Learning to Use Arduino with Proteus (Programming of LCD)
Introduction:
This article should help
you to do basic setup of Arduino Controller in Proteus, programming and
simulation of Arduino in Proteus. In this article I have tried to make it
simple to use LCD with Arduino with some simulation and programming. As
compared to my previous tutorial I am using here Arduino Controller IC instead
of Arduino Uno Board.
Proteus[i]:
Proteus combines ease
of use with powerful features to help you design, test and layout professional
PCBs like never before. With nearly 800 microcontroller variants ready for
simulation straight from the schematic, one of the most intuitive professional
PCB layout packages on the market and a world class shape based autorouter
included as standard, Proteus Design Suite 8 delivers the complete software
package for today and tomorrow's engineers.
Proteus Arduino 328:

Proteus Arduino LCD Shield:

Arduino[ii]:
Arduino is an
open-source electronics platform based on easy-to-use hardware and software.
It's intended for anyone making interactive projects.
Custom Characters for
LCD:
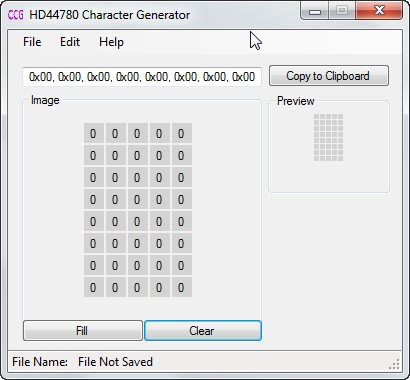

Each LCD characters
is actually calculated as 5x7.
Initiate the
character as a byte and copy the same code above for the byte value.
For
Example:
byte
g[8]= { 0x00,
0x00, 0x0A, 0x04, 0x0A, 0x00, 0x0E, 0x00};
It is very useful
tool to create custom characters. And you can display them on LCD.
Steps:
1. Proteus
Project:
To
create the project follow the steps:
New
Project>Create new project > Create a Schematic from the selected
template (Landscape A4)>Create a PCB layout (Generic)>Next>Firmware
Project>Next>Finish.

2. Import
Arduino 328 in Proteus:

Import the Arduino 328 from the
snippet folder:
Folder Location:
C:\Program Files (x86)\Labcenter
Electronics\Proteus 8 Professional\Snippets

Import Steps:
Goto File>Import Project Clip
3. Import
Arduino LCD Shield in Proteus:
Folder and Steps to
import are same as of Arduino 328.

4.
Complete Circuit:
The complete circuit showed look like the
following:

There is not any other component you need to put
for the LCD programming.
5.
Programming:
Follow the steps below to setup programming.
Source Code Section>System>Compilers
Configuration

Make Sure it is as per diagram above. If you have
Arduino Software Install then it should be already there. Otherwise just click
Download and use “Arduino AVR”.
Use
the Following Programme:
/*
Main.ino file generated by New Project wizard
*
* Created:
Fri Jan 6 2017
* Processor: ATmega328P
* Compiler:
Arduino AVR */
#include <LiquidCrystal.h>
#include <stdio.h>
#include <stdlib.h>
#include <math.h>
LiquidCrystal
lcd(8,9,4,5,6,7);
//
make custom characters
byte
g[8]= {0x00, 0x04, 0x0E, 0x1F, 0x1F, 0x04, 0x00, 0x00};
byte
n[8]= {0x00, 0x04, 0x0E, 0x1F, 0x1F, 0x04, 0x00, 0x00};
//int
motorPin1 = 2;
//int
motorPin2 = 3;
void
setup() // put your setup code here, to run once:
{
//pinMode(motorPin1,
OUTPUT);
//pinMode(motorPin2,
OUTPUT);
lcd.begin(16,2);
//lcd.print("Motor
");
lcd.write(byte(0));
lcd.write(byte(2));
lcd.print(" Galaxian! ");
lcd.write(byte(0));
lcd.write(byte(2));
//lcd.print("
Fwd Dir");
}
void
loop() // put your main code here, to run repeatedly:
{
lcd.noDisplay();
delay(500);
// lcd.clear();
// lcd.display();
lcd.createChar(0, g);
lcd.createChar(2, n);
lcd.setCursor(0,1);
lcd.print(millis()/1000);
lcd.setCursor(2,1);
lcd.print(" sec ");
lcd.setCursor(7,1);
lcd.print(millis()/1000*0.0167);
lcd.setCursor(10,1);
lcd.print(" min ");
lcd.display();
delay(500);
}
|
6.
Output Display:
The
output display should look like below:

Resources:

Thanks For Sharing!!
ReplyDeleteiProteus crack
Great Information I collect Many Ideas This Blog Side Awesom I Really Like It
ReplyDeleteapowersoft-video-editor-crack
proteus-crack
facebook-social-toolkit-crack
wondershare-filmora-crack
gbwhatsapp-crack
ReplyDeleteGreat set of tips from the master himself. Excellent ideas. Thanks for Awesome tips Keep it up
Proteus Crack
Grand Theft Auto V Crack
Website Auto Traffic Crack
I guess I am the only one who came here to share my very own experience.
ReplyDeleteGuess what!? I am using my laptop for almost the past 2 years, but I had no idea of solving some basic issues.
I do not know how to Download Cracked Pro Softwares But thankfully, I recently visited a website named procrackhere.com
Proteus Pro Crack
I guess I am the only one who came here to share my very own experience. Guess what!? I am using my laptop for almost the past 2 years, but I had no idea of solving some basic issues. I do not know how to Download Cracked Pro Softwares But thankfully, I recently visited a website named procrackhere.com
ReplyDeleteAll Pro Cracked Softwares Download
Proteus Pro Crack
ReplyDeleteMany thanks for sharing such incredible knowledge. It's really good for your website.
The info on your website inspires me greatly. This website I'm bookmarked. Maintain it and thanks again.
I'm really impressed with your writing skills, as smart as the strucAOMEI
Proteus Pro Crack