Posts

Showing posts from August, 2016

BLINKING LED (ARDUINO + PROTEUS)

Image
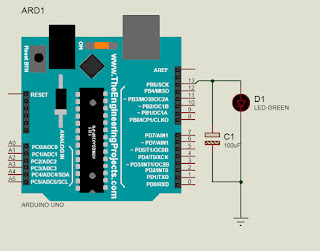
ARDUINO BLINK LED STEP 1: IMPORT ARDUINO BOARD IN PROTEUS Watch The Video : STEP 2: PROGRAM: Convert the Arduino Program into hex File. Follow the below steps: a. Open Arduino Software b. Goto Preference From File Menu c. Check  d. Click Ok e. Open Example Program  f. Compile The Program Now g.  h. Go TO the address circled in the step g. i. Copy the Hex File in any other location. ----------------------------------- How to use this hex file with Arduino Board in Proteus: a. Open Proteus. b. Choose the Board from Library.. c. Double Click the Board d.  e. Choose the folder in program file and Select the Blink Hex File. --------------------------------------------- Simulation : ----------------------------------- Thank you ... Give Comments/ Feedback for Improvement.

7 SEGMENT DISPLAY - PIC 16F877A

Image
7 SEGMENT DISPLAY                                                      Schematic Diagram (Proteus Used)                                                                   PCB Layput (Proteus Used) Coding : Siulation done in Proteus /* Main.c file generated by New Project wizard  *  * Created:   Tue Apr 12 2016  * Processor: PIC16F877A  * Compiler:  HI-TECH C for PIC10/12/16  */ #include <htc.h> void delay(); void main(void)  {    unsigned char i,j,ar[]={0xC0,0xF9,0xA4,0xB0,0x99,0x92,0x82,0xF8,0x80,0x90};    TRISB=0x00;    TRISC=0X00;      do    {       for(i=0;i<10;i++)       { PORTC=ar[i]; delay(); delay(); delay(); delay();       for(j=0;j<10;j++)       { PORTB=ar[j];    delay(); delay(); delay(); }    } }      while (1);  }  void delay()  {     unsigned char i,j;     for(i=0;i<100;i++);        for (j=0;j<240;j++);      } *can add delay in PORTC and PORTB for more delay in display